Dataflow Part 5 - Diego Cell Routes Table
Assumptions
- You have a CF deployed with at least 2 diego cells
- You have two proxy apps pushed and named appA and appB (the fewer apps you have deployed the better)
Review
This track of stories is going to go through the steps (listed below) that were covered in the dataflow overview. The steps and diagram will be at the top of each story in case you need to orient yourself. Higher quality diagram here.

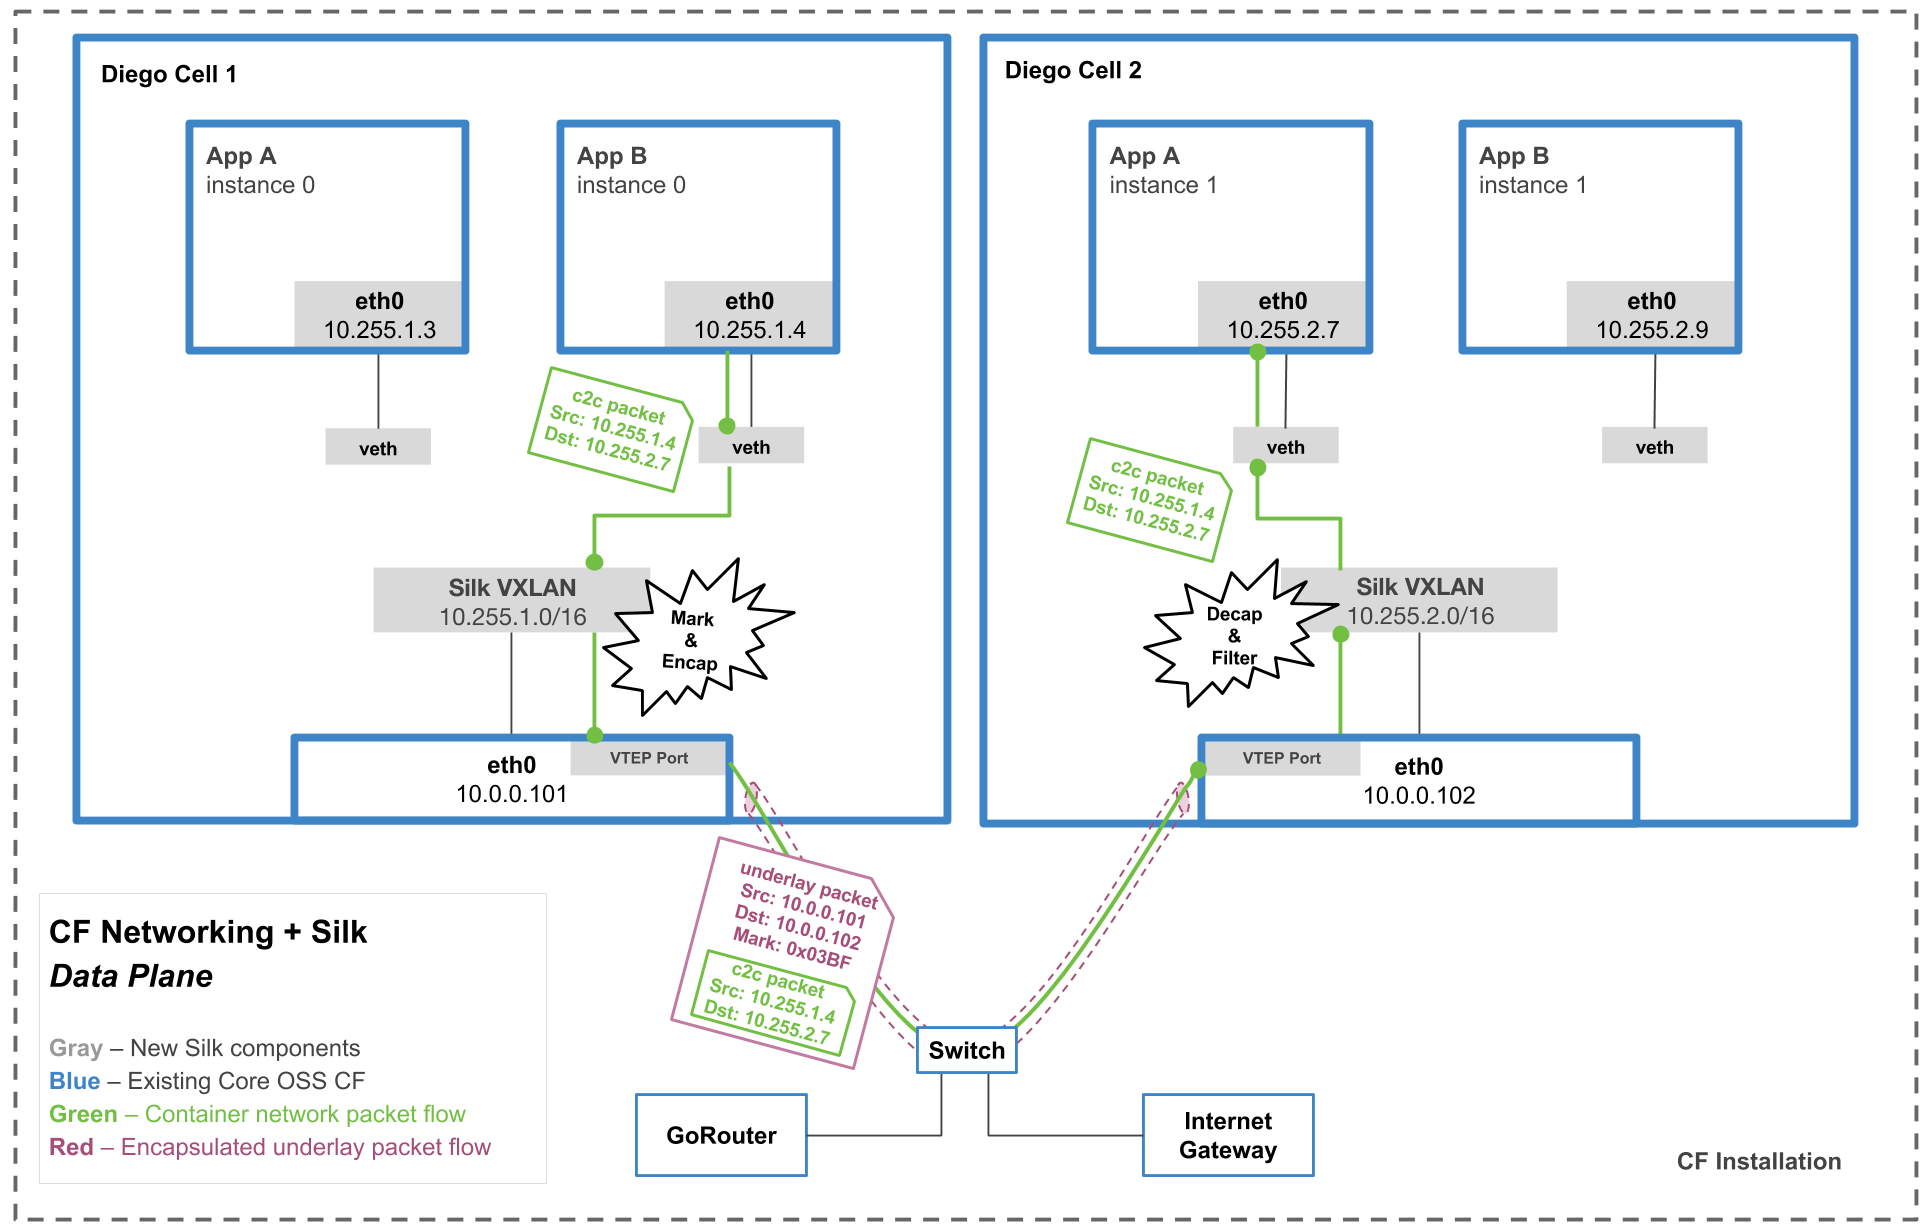
- AppB (on Diego Cell 1) makes a request to AppA’s overlay IP address (on Diego Cell 2). This packet is called the overlay packet (aka the c2c packet).
- The packet exits the app container through the veth interface.
- **The overlay packet is marked with a …mark… that is unique to the source app.
- Because the packet is an overlay packet, it is sent to the silk-vtep interface on the Diego Cell. This interface is a VXLAN interface. <——- CURRENT STORY
- The overlay packet is encapsulated inside of an underlay packet. This underlay packet is addressed to underlay IP of the Diego Cell where the destination app is located (appA in this case).
- The underlay packet exits the cell.
- The packet then travels over the physical underlay network to the correct Diego Cell.
- The packet arrives to the correct Diego Cell
- The underlay packet is decapsulated. Now it’s just the overlay packet again.
- Iptables rules check that appA is allowed to talk to appB based on the mark on the overlay packet.
- If traffic is allowed, the overlay network directs the traffic to the correct place.
What
In the last story, you were introduced to what a routes table is. In this story we are going to look at the routes table on a Diego Cell and decipher what is there.
There are two easy ways to look at the route table. The old way is route -n,
which displays the information nicely with headers. The new way is ip route
which displays the information with no headers to make scripting easier. This
story is going to use route -n because headers are good.
How
📝 Look at routes table
- Ssh onto the Diego Cell where appA is running and become root.
- Look at the routes table
route -nBelow is the output from a Diego Cell with two apps running on it. The output is split so we can look at it one section at a time. The output has been condensed for clarity and brevity.
⬇️ This is the default rule that sends traffic to eth0 by default
Destination     Gateway         Genmask         Iface
0.0.0.0         10.0.0.1        0.0.0.0         eth0
⬇️ This is the rule that sends all overlay traffic to the silk-vtep interface. (This is the key bit to this story!)
Destination     Gateway         Genmask         Iface
10.255.0.0      0.0.0.0         255.255.0.0     silk-vtep
⬇️ This is the overlay IP range for the other Diego Cell on the network. (We’ll talk more about this in a later story.)
Destination     Gateway         Genmask         Iface
10.255.82.0     10.255.82.0     255.255.255.0   silk-vtep
⬇️ These are istio routers, which are also on the overlay network. If you don’t have istio-release deployed, you won’t see these. These are not important for this onboarding.
Destination     Gateway         Genmask         Iface
10.255.0.160    10.255.0.160    255.255.255.255 silk-vtep
10.255.0.225    10.255.0.225    255.255.255.255 silk-vtep
⬇️ These are the apps running on this Diego Cell. The interface is the host side of the veth pair.
Destination     Gateway         Genmask         Iface
10.255.77.3     0.0.0.0         255.255.255.255 s-010255077003
10.255.77.4     0.0.0.0         255.255.255.255 s-010255077004
Expected Outcome
You look at the routes table on a Diego Cell and can decipher what you see.